The Model Manger will be in charge of completing the following tasks:
1. Position buildings on site
a. Using survey, determine a logical origin point. Nearest survey benchmark to the building should be used.
b. Create architectural AutoCAD site plan from survey by:
I. Freezing unnecessary layers.
II. Wblock remaining layers to new file name.
III. Open new file, move all from origin point to 0,0 check insbase.
c. Create Revit file w/ Autocad site.
d. Position preliminary building on site.
e. Set project north.
2. Work with James V./Steve F. to create ftp site if necessary. FTPs are used in our office to make the latest Revit model available to the team automatically on a daily basis. Newforma should be used for all other file transfers.
3. Communicate with consultants to:
a. Ensure timely uploads of their data to the FTP site (for Revit) or Newforma for all other files.
b. Provide support files - site, Revit files.
c. Explain Newforma process.
4. Process consultant downloads by:
a. Disconnecting their file from their central file.
b. Strip out unnecessary and circular linked files.
c. Save to correct Q: drive folder with correct name.
5. Provide support to team by answering questions.
6. Keep model streamlined by:
a. Auditing file regularly.
b. Compressing file regularly.
c. Purging the file at opportune times.
d. Ensure new local files are created by team every Monday.
e. Resolve “Warnings”.
7. Family creation and support.
a. Keep watch over family creation to prevent problems.
b. Downloaded families are often much more detailed than desired, adding too much data to file.
c. Be aware of families in project that may be useful to other projects, and the families created that may be useful to your project.
Thursday, November 19, 2009


Friday, November 6, 2009
Revit Keyboard Accelerators
This is a great PDF file that not only lists the short keys commands, but also details keyboard tricks to help you edit in Revit.
http://davidddriver.com/Product/Freebies/Revit/Revit%20keyboard%20ShortcutsVert.pdf
http://davidddriver.com/Product/Freebies/Revit/Revit%20keyboard%20ShortcutsVert.pdf
Tuesday, August 25, 2009
Revit Model and Consultant Coordination
There is a great way to visually check linked revit models with each other by bringing them into SketchUp.
In Revit, while in the 3D view, Click FILE, EXPORT, CAD FORMATS and choose AUTOCAD 2004 dwg format then SAVE to location of choice.
This will produce a separate 3D dwg file for each linked Revit file including the central file.
In SketchUp, Click FILE, IMPORT, browse to the location of saved dwg files above, FILES OF TYPE should be set to ACAD DWG/DWF, OPEN.
Import each dwg file into the same SketchUp file.
Each DWG will come in as a component which can easily be asigned a specific color.
Some alignment between components may be necessary.
Now you can quickly walk through your model looking for any places Structural, Site, or MEP components may be exposed through the architectural model.
I hope this helps you find costly errors before they are constructed.
In Revit, while in the 3D view, Click FILE, EXPORT, CAD FORMATS and choose AUTOCAD 2004 dwg format then SAVE to location of choice.
This will produce a separate 3D dwg file for each linked Revit file including the central file.
In SketchUp, Click FILE, IMPORT, browse to the location of saved dwg files above, FILES OF TYPE should be set to ACAD DWG/DWF, OPEN.
Import each dwg file into the same SketchUp file.
Each DWG will come in as a component which can easily be asigned a specific color.
Some alignment between components may be necessary.
Now you can quickly walk through your model looking for any places Structural, Site, or MEP components may be exposed through the architectural model.
I hope this helps you find costly errors before they are constructed.
Thursday, May 7, 2009
AUGI Revit Wishlist
Follow this link to add your thoughts and wishes...
http://www.augi.com/revit/submitwish.asp?page=1600
http://www.augi.com/revit/submitwish.asp?page=1600
Tuesday, July 8, 2008
Revit Architecture 2009 (English)
Autodesk has a website that has short tutorials. It is available to subscription members, which Overland is. The site can be accessed by clicking on:
http://subscription.autodesk.com/sp/servlet/elearning/course?catID=11484791&cfID=Revit+Architecture+%28Autodesk+Revit+Building%29&siteID=11564774
http://subscription.autodesk.com/sp/servlet/elearning/course?catID=11484791&cfID=Revit+Architecture+%28Autodesk+Revit+Building%29&siteID=11564774
Thursday, June 12, 2008
Revit Tutorials
If you were looking to brush up on your Revit skills...
JB points out that you can download them from the AutoDesk website for free here AutoDesk Revit Architecture 2009 and AutoDesk Revit Architecture 2008.
Autodesk in their wisdom didn't include tutorials with their software... I guess it didn't fit on the DVD.
Follow the instructions and you'll be on your way... happy Reviting.
JB points out that you can download them from the AutoDesk website for free here AutoDesk Revit Architecture 2009 and AutoDesk Revit Architecture 2008.
Autodesk in their wisdom didn't include tutorials with their software... I guess it didn't fit on the DVD.
Follow the instructions and you'll be on your way... happy Reviting.
Saturday, June 7, 2008
Import/Link a Sketchup Model into Revit
In summary, there are three ways to "Import/Link" a SketchUp file into Revit.
They all have their positives and negatives.
The "Link" way is to import the SketchUp model into the Revit file with a simple Import/Link. Doing it this way allows you to Link the file which is great if you plan on managing two files :( especially if the SketchUp file is going to change and inform the Revit model.
The "Revit" way is to Import/Link the Sketchup model into a "Mass Object" like the Revit Tutorials describe. Doing it this way does allow you to take sections of the SketchUp model and other views display the model like you expect. This method does not allow you to "Link" the Sketchup model.
The "Family" way is to Import/Link the SketchUp model into a "Create a Family Object in Place". This allows you to identify what "Family" the SketchUp object belongs to Generic Models, Walls, Roofs, etc. This allows you to control the visibility of the model including the imported SketchUp model since it is now a Generic Model, Walls, Roofs, etc. This method does not allow you to "Link" the Sketchup model. You may want to break apart your SketchUp model before you bring it in so that it is more accurate to what "Family" you assign it to.
The "Link" way is -
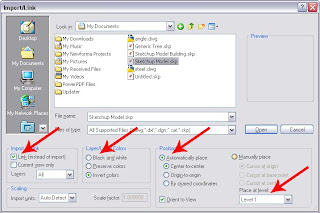
File > Import/Link > Cad Formats

Import/Link > Link (Allows you to update the Sketchup file as needed, this option although does not allow the Sketchup model to be viewed correctly.) You can choose either one the difference is that the SketchUp model will not or will be able to be updated. Then you can select "Black and White", "Automatically Place" (X & Y) and "Place at Level" (Z).
At this point the SketchUp model should appear in your Revit file.
Now, the SketchUp file changes, you can update the Revit file by opening the "Manage Links" dialog box.
File> Manage Links>
Then select the linked file and "Update" the link.
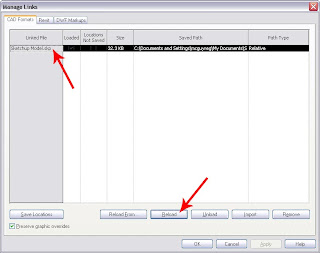
Now your SketchUp model should be updated in your Revit file.
The "Revit" way is similar execpt that you first create a "Mass Object" and then you Import/Link the Sketchup model in the Revit file.
Subscribe to:
Posts (Atom)


