Autodesk has a website that has short tutorials. It is available to subscription members, which Overland is. The site can be accessed by clicking on:
http://subscription.autodesk.com/sp/servlet/elearning/course?catID=11484791&cfID=Revit+Architecture+%28Autodesk+Revit+Building%29&siteID=11564774
Tuesday, July 8, 2008
Thursday, June 12, 2008
Revit Tutorials
If you were looking to brush up on your Revit skills...
JB points out that you can download them from the AutoDesk website for free here AutoDesk Revit Architecture 2009 and AutoDesk Revit Architecture 2008.
Autodesk in their wisdom didn't include tutorials with their software... I guess it didn't fit on the DVD.
Follow the instructions and you'll be on your way... happy Reviting.
Saturday, June 7, 2008
Import/Link a Sketchup Model into Revit
In summary, there are three ways to "Import/Link" a SketchUp file into Revit.
They all have their positives and negatives.
The "Link" way is to import the SketchUp model into the Revit file with a simple Import/Link. Doing it this way allows you to Link the file which is great if you plan on managing two files :( especially if the SketchUp file is going to change and inform the Revit model.
The "Revit" way is to Import/Link the Sketchup model into a "Mass Object" like the Revit Tutorials describe. Doing it this way does allow you to take sections of the SketchUp model and other views display the model like you expect. This method does not allow you to "Link" the Sketchup model.
The "Family" way is to Import/Link the SketchUp model into a "Create a Family Object in Place". This allows you to identify what "Family" the SketchUp object belongs to Generic Models, Walls, Roofs, etc. This allows you to control the visibility of the model including the imported SketchUp model since it is now a Generic Model, Walls, Roofs, etc. This method does not allow you to "Link" the Sketchup model. You may want to break apart your SketchUp model before you bring it in so that it is more accurate to what "Family" you assign it to.
The "Link" way is -
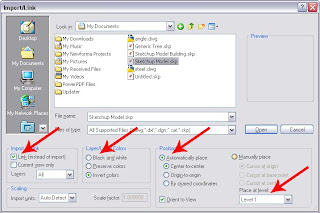
File > Import/Link > Cad Formats

Import/Link > Link (Allows you to update the Sketchup file as needed, this option although does not allow the Sketchup model to be viewed correctly.) You can choose either one the difference is that the SketchUp model will not or will be able to be updated. Then you can select "Black and White", "Automatically Place" (X & Y) and "Place at Level" (Z).
At this point the SketchUp model should appear in your Revit file.
Now, the SketchUp file changes, you can update the Revit file by opening the "Manage Links" dialog box.
File> Manage Links>
Then select the linked file and "Update" the link.
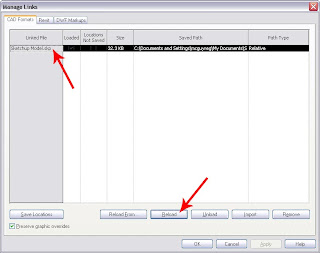
Now your SketchUp model should be updated in your Revit file.
The "Revit" way is similar execpt that you first create a "Mass Object" and then you Import/Link the Sketchup model in the Revit file.
Friday, January 11, 2008
Creating a Stone Panel Family and Schedule
Problem: We needed to create lots of stone panels for the UTSAC project. The stone panels had to be able to be scheduled
Solution: The panels were created as a generic model family. All of the parts were created as solid masses. The key to making the objects scheduleable was creating the parameters as shared parameters. A shared parameter is defined when you hit "shared parameter" "select" then "edit". You can define parameters and groups of parameters within this dialog box. These parameters are stored in a text file which is used by Revit to help define the schedule. I created Height, Width, and Panel Type parameters.
You still have to "load" the parameters. You do this in the same dialog box you would normally create the paramter. First select the dimension that you want to add a parameter to. This will cause the "label" field to appear. Select the drop arrow in the label field, and you choose. Select "shared parameter" and select one of the parameters you want to add. Unfortunately, you can't select multiple parameters. OK back to the parameter properties dialog. Then repeat the process for all of the other parameters you want to add. Once the shared parameters are added, they can be linked to your dimensions.
After I created the stone panel, I loaded it into the UTSAC model. I still needed to create a schedule of the panel. You have to create the schedule in the category. After hitting "OK" you go to the schedule properties dialog box. Select the "add parameter" button, then "shared parameter" radio button. You can now select the shared parameters you setup in the family.
Solution: The panels were created as a generic model family. All of the parts were created as solid masses. The key to making the objects scheduleable was creating the parameters as shared parameters. A shared parameter is defined when you hit "shared parameter" "select" then "edit". You can define parameters and groups of parameters within this dialog box. These parameters are stored in a text file which is used by Revit to help define the schedule. I created Height, Width, and Panel Type parameters.
You still have to "load" the parameters. You do this in the same dialog box you would normally create the paramter. First select the dimension that you want to add a parameter to. This will cause the "label" field to appear. Select the drop arrow in the label field, and you choose
After I created the stone panel, I loaded it into the UTSAC model. I still needed to create a schedule of the panel. You have to create the schedule in the
Subscribe to:
Posts (Atom)
